   |

|
|
Push-button Patches by... Thistledown & co.

This 34" square quilt goes together at warp speed using raw edge fusible applique for the block centers.
Use Push-button PrintsTM for all the fabrics or intersperse with some from your scrap stash.
Supplies
The model quilt was made entirely of Push-button PrintsTM fabric images except for the binding and backing.
Print one sheet of the following (or large scraps from your stash (8-1/2" squares and 5" squares) to get a similar look as the model or just pick your favorites.
14 ~ Blues
9 ~ Greens
16 ~ Reds/pinks
9 ~ Purples
12 ~ Orange/yellows
14 ~ Browns
1 pkg. 1/4" Steam-a-Seam2TM fusible tape
1-1/2 yds. of fabric for backing & binding
40" square of batting
Cutting
Block A
Six 7-1/4" squares
Six 5" center squares
Block B
Seven 7-1/4" squares
Seven 4" center squares
^Block C (these will be cut in half diagonally later)
Twelve 9-1/8" squares
Twelve 5" center squares
^Block D (these will be cut in half diagonally later)
Twelve 8-1/8" squares
Twelve 4" center squares
*Note~After cutting the C & D blocks in half diagonally only one half of each block will be used. If you'd rather, you can use them in the quilt and make only six of the C & D blocks called for which will result in some duplicates. If you don't want any duplicate 1/2 blocks then make the number called for (twelve each) and set the extra half blocks aside for another quilt.
|
|
|
Making the Blocks:
|
|
Adhere the 1/4" Steam-a-Seam fusible to all four edges of the wrong side on all the 4" and 5" squares.
|
|
Block A
Center six 5" squares on six of the 7-1/4" blocks and fuse in place following the manufacturers instructions.
|
|

|
|
|
Block B
Center seven 4" squares on the remaining seven 7-1/4" squares and fuse in place.
|

|
|
|
Block C
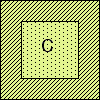
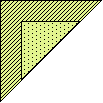
Center 5" squares on twelve (or six) of the 8-1/8" squares. Fuse in place. Cut each C block in half diagonally.
|
|
|
|
|
Block D
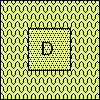
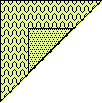
Center 4" squares on the remaining 8-1/8" squares. Fuse in place. Cut each D block in half diagonally.
|
|
|
|
|
If you'd like, you can carefully cut away the underlying fabrics of the blocks to reduce bulk. Also, if desired, you can topstitch along the edges of the center squares with a straight or decorative stitch.
Pair up a cut C block with a cut D block and stitch along the long side with a 1/4" seam to make a C/D block as shown. Press the seam to the darker fabric.
|

|
|
|
|
Layout
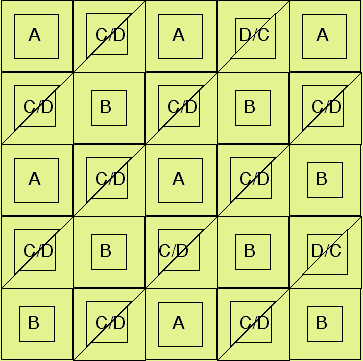
Referring to the diagram on the following page, the cover photo, and your own choices, layout the blocks. Play around with color placement and layout. It's your quilt, you can do whatever you want. The quilt police will not come after you for being creative.
When you have finally decided on the final placements, stitch the quilt into 5 rows using a 1/4" seam. Press the seam allowances in each row in alternate directions. Stitch the rows together.
|
|
|
Layout the quilt backing, batting and finished top. Machine quilt. The model was quilted with a free motion flower in each block. Cut four 2" x 42" strips of desired binding fabric. Trim the backing and batting even with the quilt edge and bind.
Add a hanging sleeve and labels.
Note card projects
cards designed by ... Randy Schoolcraft
Triplet card
supplies
1 blank 4-1/4" x 5-1/2" note card
1-1/4" square punch
1-1/2" square punch
5 1/2" x 1/8" pop-dotsTM sticky mounts
double stick tape or adhesive for mounting
3 different paper prints
prints used in model:
rimose turquoise - printed on matte cardstock
slick pink - printed on matte cardstock
bimini orange - printed on semi-gloss photo paper
instructions
Cut out a 4-1/4" x 5-1/2" piece from the turquoise.
Adhere to face of note card.
Punch out three 1-1/2" squares from pink
Punch out three 1-1/4" squares from orange
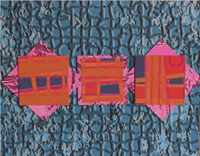
Place 1 pink square in center of card front and mount with pop-dots. Place the remaining pink square turned diagonally above and below the center square. mount with pop-dots. Mount one of the orange squares flush onto the center pink square. Using pop-dots, mount the remaining two squares diagonally on to the pinks. They will slightly overlap the center square.
Centerpointe card
supplies
1 blank 4-1/4" x 5-1/2" note card
2" square paper punch
2-1/2" triangle paper punch
1/2" round paper punch
9 1/2" x 1/8" pop-dotsTM sticky mounts
5 different paper prints
Double stick tape or adhesive for mounting
Prints used in model:
Nexus pink - printed on matte cardstock
Slick pink - printed on matte cardstock
Bimini orange - printed on semi-gloss photo paper
Rimose turquoise - printed on matte cardstock
Fej yellow - printed on matte cardstock
instructions
Cut out a 4-1/4" x 5-1/2" piece from the nexus pink.
Adhere to face on note card.
Punch out one 2" square from yellow. Flush mount to center of card.
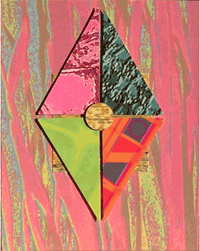
Punch out a 2-1/2" triangle from 4 papers (rimose turquoise, samba yellow / gr, bimini orange and slick pink). Cut the triangle in half starting at the point. Discard half. Referring to the photo, arrange the shapes to form a diamond. Center the diamond shape over the yellow square. Leave an 1/8" gap between the shapes. Mount with 2 pop-dotsTM under each shape. Punch out a 1/2" circle from the yellow and mount in the center with one pop-dotTM.
|
|
|
|
 |
|